[Get the best value vapor headlight restoration on Amazon today!]
# Vapor Headlight Restoration: Is it Worth it? (2026 Review)
Foggy, yellowed headlights are a common problem, and they’re not just unsightly. They can seriously compromise your nighttime visibility, making driving more dangerous. If you’re dealing with hazy headlights, you’ve probably come across vapor headlight restoration as a potential solution. But is it worth the hype? In this 2026 review, we’ll dive deep into what vapor headlight restoration is, how it works, the pros and cons, and whether it’s the right choice for you. Let’s clear things up!
[Browse top-rated vapor headlight restoration on Amazon]
## Understanding Vapor Headlight Restoration
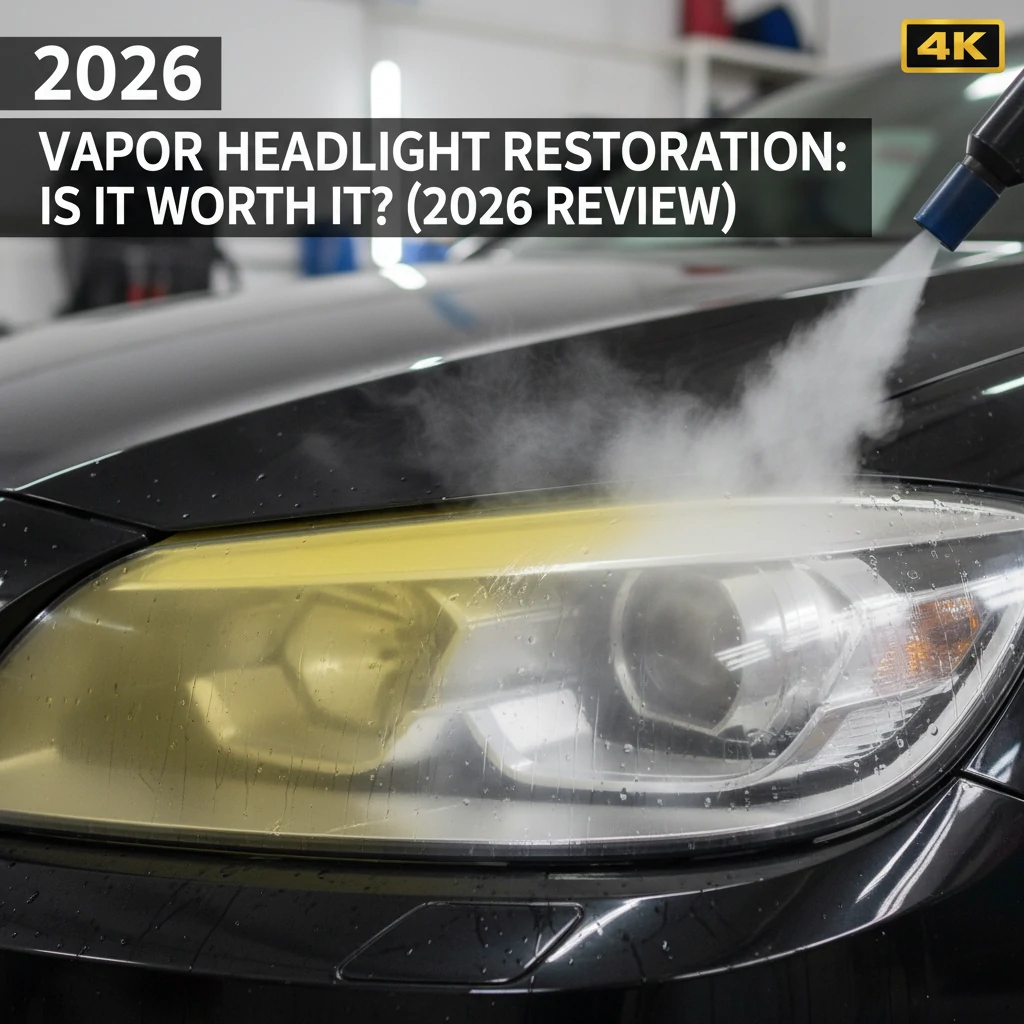
Vapor headlight restoration, also known as steam headlight restoration, is a process that uses a heated chemical vapor to restore clarity to your headlight lenses. Unlike sanding and polishing methods, which physically remove the damaged outer layer, vapor restoration applies a new protective coating. This process claims to provide a longer-lasting result and a more even finish.
But how does it work, and why is it different from other methods? Let’s break it down.
[Browse top-rated vapor headlight restoration on Amazon]
## How Vapor Headlight Restoration Works
The **vapor headlight restoration** process typically involves these steps:
1. **Preparation:** The area around the headlight is carefully masked off to protect the paint.
2. **Sanding (Sometimes):** Some technicians might lightly sand the headlight surface to remove the worst of the oxidation and create a better surface for the vapor to adhere to. However, many vapor restoration processes skip this step entirely.
3. **Heating the Solution:** A special chemical solution (usually a polycarbonate restoration fluid) is heated in a small device until it turns into a vapor.
4. **Applying the Vapor:** The heated vapor is then directed onto the headlight lens, where it condenses and forms a new, clear coating.
5. **Curing:** The new coating is allowed to cure and harden, typically for a few hours.
The key difference with **vapor headlight restoration** is the application of this vaporized polycarbonate solution. It essentially creates a brand-new lens surface, rather than just polishing the existing one. This is why many proponents claim it lasts longer than traditional methods.
[Browse top-rated vapor headlight restoration on Amazon]
## The Benefits of Vapor Headlight Restoration
So, why should you consider **vapor headlight restoration**? Here are some of the key advantages:
* **Longer-Lasting Results:** Because it applies a new protective layer, vapor restoration tends to last longer than sanding and polishing alone. Many users report clear headlights for a year or more, depending on environmental conditions.
* **More Even Finish:** The vapor application ensures a more even and consistent coating, eliminating swirl marks or uneven spots that can sometimes occur with sanding.
* **Less Abrasive:** Vapor restoration can be less abrasive than sanding, which means it’s less likely to damage the underlying headlight lens material. Some processes even skip sanding altogether.
* **Improved Visibility:** Clear headlights significantly improve nighttime visibility, making driving safer for you and others.
* **Enhanced Appearance:** Clear headlights make your car look newer and better maintained.
[Browse top-rated vapor headlight restoration on Amazon]
## The Drawbacks of Vapor Headlight Restoration
While **vapor headlight restoration** offers several benefits, it’s essential to be aware of the potential drawbacks:
* **Cost:** Vapor restoration can be more expensive than DIY sanding and polishing kits. Professional services typically range from $75 to $150 per headlight.
* **Professional Application Recommended:** While DIY vapor restoration kits are available, achieving professional-quality results can be challenging. It’s generally recommended to have it done by a trained technician.
* **Potential for Streaking or Runs:** If the vapor is not applied correctly, it can result in streaking or runs in the new coating.
* **Not a Permanent Solution:** While longer-lasting than some methods, vapor restoration is not a permanent fix. Eventually, the headlights will likely need to be restored again.
* **Quality of Solution Matters:** The effectiveness of the **vapor headlight restoration** depends heavily on the quality of the polycarbonate solution used. Cheaper solutions may not provide the same level of clarity or durability.
[Browse top-rated vapor headlight restoration on Amazon]
## Vapor Headlight Restoration vs. Sanding and Polishing: Which is Better?
The debate between **vapor headlight restoration** and traditional sanding and polishing boils down to a few key factors: longevity, cost, and ease of application.
* **Longevity:** Vapor restoration generally lasts longer than sanding and polishing alone. The new protective coating provides better resistance to UV damage and oxidation.
* **Cost:** Sanding and polishing kits are typically cheaper than professional vapor restoration services or DIY vapor restoration kits.
* **Ease of Application:** Sanding and polishing can be done relatively easily at home with readily available kits. Vapor restoration requires more specialized equipment and techniques.
Ultimately, the best method depends on your budget, skill level, and desired outcome. If you’re looking for the longest-lasting results and don’t mind paying a bit more, **vapor headlight restoration** is a good choice. If you’re on a tight budget and willing to put in some elbow grease, sanding and polishing can be a viable alternative.
[Browse top-rated vapor headlight restoration on Amazon]
## Is DIY Vapor Headlight Restoration Possible?
Yes, DIY **vapor headlight restoration** kits are available on the market. These kits typically include the heating device, the polycarbonate solution, and masking tape. However, it’s important to note that achieving professional-quality results with a DIY kit can be challenging.
Here are some tips for DIY **vapor headlight restoration**:
* **Read the Instructions Carefully:** Follow the manufacturer’s instructions precisely.
* **Prepare the Surface Properly:** Clean the headlights thoroughly and lightly sand them if recommended by the kit instructions.
* **Mask the Area Well:** Protect the surrounding paint with high-quality masking tape.
* **Apply the Vapor Evenly:** Move the heating device slowly and steadily across the headlight lens to ensure an even coating.
* **Allow Sufficient Curing Time:** Let the coating cure completely before exposing the headlights to the elements.
Even with careful application, DIY results may not be as good as professional results. If you’re not comfortable with the process or want the best possible outcome, it’s best to leave it to the professionals.
[Browse top-rated vapor headlight restoration on Amazon]
## Recommended Products for Headlight Restoration
Whether you choose **vapor headlight restoration** or a traditional method, having the right tools and products is crucial. Here are a few recommendations:
* **Sanding and Polishing:**
* **Meguiar’s Headlight Restoration Kit:** A popular and effective kit for sanding and polishing headlights. It includes various grit sandpaper pads, polishing compound, and a sealant.
* **Vapor Headlight Restoration (Professional Service):**
* **Research Local Auto Detailing Shops:** Look for reputable auto detailing shops in your area that offer **vapor headlight restoration** services. Check online reviews and ask for before-and-after photos.
* **DIY Vapor Headlight Restoration Kit:**
* **3M Headlight Restoration Quick Clear Coat:** This kit includes a vapor application for a clear coat finish, providing a longer-lasting protection.
[Browse top-rated vapor headlight restoration on Amazon]
## What to Look for in a Vapor Headlight Restoration Service
If you decide to go with professional **vapor headlight restoration**, here’s what to look for in a service provider:
* **Experience:** Choose a shop with experience in **vapor headlight restoration**. Ask for examples of their previous work.
* **Quality of Solution:** Inquire about the type of polycarbonate solution they use. Opt for a reputable brand known for its clarity and durability.
* **Warranty:** Ask if they offer a warranty on their work. A good warranty can give you peace of mind.
* **Preparation Process:** Make sure they properly prepare the headlights before applying the vapor. This includes cleaning and masking the area.
* **Customer Reviews:** Check online reviews to see what other customers have to say about their experience.
[Browse top-rated vapor headlight restoration on Amazon]
## Maintaining Your Restored Headlights
Once your headlights have been restored, it’s important to maintain them to prevent them from yellowing again. Here are some tips:
* **Park in the Shade:** Whenever possible, park your car in the shade to protect the headlights from direct sunlight.
* **Apply a UV Protectant:** Regularly apply a UV protectant spray or sealant to the headlights to block harmful UV rays.
* **Wash Your Car Regularly:** Wash your car regularly to remove dirt and grime that can contribute to headlight oxidation.
* **Consider Headlight Protection Film:** Apply a clear headlight protection film to provide an extra layer of protection against scratches and UV damage.
[Browse top-rated vapor headlight restoration on Amazon]
## The Cost of Vapor Headlight Restoration: A Breakdown
The cost of **vapor headlight restoration** can vary depending on several factors, including:
* **Location:** Prices may vary depending on your geographic location.
* **Service Provider:** Different auto detailing shops may charge different rates.
* **Condition of Headlights:** Severely oxidized headlights may require more extensive preparation, which can increase the cost.
* **DIY vs. Professional:** DIY kits are generally cheaper than professional services, but may not provide the same level of results.
On average, professional **vapor headlight restoration** can cost between $75 and $150 per headlight. DIY kits typically range from $30 to $60.
[Browse top-rated vapor headlight restoration on Amazon]
## Common Mistakes to Avoid During Headlight Restoration
Whether you’re doing it yourself or hiring a professional, here are some common mistakes to avoid during headlight restoration:
* **Skipping Preparation:** Proper preparation is crucial for achieving good results. Don’t skip steps like cleaning and masking.
* **Using the Wrong Products:** Use only products that are specifically designed for headlight restoration.
* **Applying Too
[Check the latest prices and deals for vapor headlight restoration on Amazon today!]