[Get the best value interior and exterior car wash on Amazon today!]
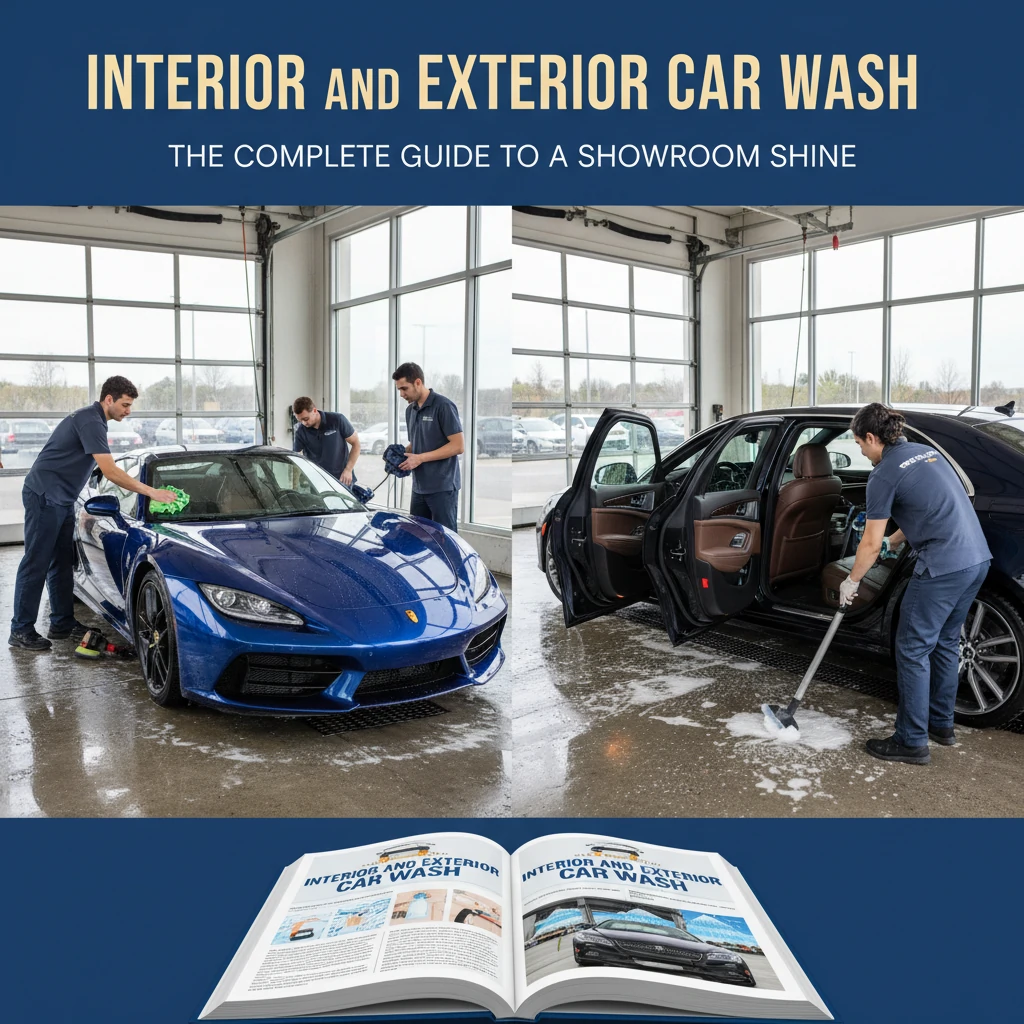
# Interior and Exterior Car Wash: The Complete Guide to a Showroom Shine
Okay, so you want your car to look like it just rolled off the showroom floor? You’re in the right place! Achieving that head-turning shine isn’t as difficult as you might think. This complete guide will walk you through every step of both an interior and exterior car wash, leaving your ride looking its absolute best. We’ll cover everything from gathering the right supplies to the final detailing touches. Let’s get started and transform your car from drab to dazzling!
[Browse top-rated interior and exterior car wash on Amazon]
## The Importance of a Regular Car Wash (Inside and Out)
Before we dive into the nitty-gritty, let’s talk about why regular interior and exterior car washes are so important. It’s not just about aesthetics (though a clean car *is* a beautiful thing!).
* **Protects Your Paint:** Road grime, bird droppings, tree sap, and even sunlight can damage your car’s paint over time. Washing removes these contaminants before they can cause lasting harm.
* **Maintains Interior Value:** A clean interior is a sign of a well-maintained vehicle. Regular cleaning prevents stains, odors, and wear and tear, which can help retain your car’s resale value.
* **Improves Air Quality:** Dust, pollen, and other allergens can accumulate inside your car, affecting air quality and potentially triggering allergies or respiratory issues.
* **Enhances Driving Safety:** A clean windshield and mirrors are essential for clear visibility, especially in challenging weather conditions.
* **Boosts Your Mood:** Let’s face it, driving a clean car just feels good! It’s a small thing that can make a big difference in your overall driving experience.
[Browse top-rated interior and exterior car wash on Amazon]
## Exterior Car Wash: Step-by-Step to a Sparkling Finish
Now, let’s get down to the business of washing your car’s exterior. Follow these steps for a truly showroom-worthy shine:
### Step 1: Gather Your Supplies
Having the right tools and products is crucial for a successful car wash. Here’s what you’ll need:
* **Two Buckets:** One for soapy water and one for rinsing.
* **Car Wash Soap:** Use a soap specifically designed for cars. Dish soap can strip away wax and damage your paint.
* **Wash Mitt:** A microfiber wash mitt is gentle on your car’s surface and won’t scratch the paint.
* **Wheel Cleaner:** A dedicated wheel cleaner will help remove brake dust and grime from your wheels.
* **Wheel Brush:** A soft-bristled brush for scrubbing your wheels.
* **Hose with Spray Nozzle:** For rinsing and applying water.
* **Drying Towels:** Microfiber drying towels are absorbent and won’t leave streaks.
* **Clay Bar (Optional):** For removing embedded contaminants.
* **Wax or Sealant (Optional):** For protecting your paint and adding shine.
### Step 2: Rinse the Car
Start by rinsing your car thoroughly with water to remove loose dirt and debris. Pay attention to areas like the wheel wells and undercarriage.
### Step 3: Wash the Wheels and Tires
Before washing the rest of your car, tackle the wheels and tires. Spray them with wheel cleaner and let it sit for a few minutes. Then, use a wheel brush to scrub away brake dust and grime. Rinse thoroughly.
### Step 4: Wash the Car with Soap and Water
Fill one bucket with car wash soap and water, following the instructions on the soap bottle. Fill the other bucket with clean water for rinsing your wash mitt.
Dip your wash mitt into the soapy water and gently wash the car, starting from the top and working your way down. Rinse the mitt frequently in the clean water bucket to remove dirt and debris. This prevents you from scratching the paint.
### Step 5: Rinse the Car Again
Rinse the car thoroughly with water to remove all traces of soap.
### Step 6: Dry the Car
Use microfiber drying towels to dry the car completely. Start from the top and work your way down, paying attention to details like door jambs and crevices.
### Step 7: Clay Bar Treatment (Optional)
If your car’s paint feels rough or gritty, consider using a clay bar to remove embedded contaminants. Follow the instructions on the clay bar packaging.
### Step 8: Wax or Sealant (Optional)
Applying wax or sealant will protect your paint from the elements and add a beautiful shine. Follow the instructions on the wax or sealant packaging.
[Browse top-rated interior and exterior car wash on Amazon]
## Interior Car Wash: Revitalizing Your Ride’s Inside
Now that the exterior is sparkling, let’s move on to the interior. A clean interior is just as important as a clean exterior!
### Step 1: Gather Your Supplies
Here’s what you’ll need for an interior car wash:
* **Vacuum Cleaner:** A handheld vacuum or a vacuum with attachments is ideal for cleaning car interiors.
* **Microfiber Cloths:** For dusting and wiping surfaces.
* **Interior Cleaner:** Choose a cleaner specifically designed for car interiors.
* **Upholstery Cleaner (If Needed):** For cleaning fabric seats and carpets.
* **Leather Conditioner (If Applicable):** For conditioning leather seats.
* **Window Cleaner:** For cleaning interior windows and mirrors.
* **Detailing Brushes:** For cleaning vents and hard-to-reach areas.
* **Trash Bags:** For collecting trash.
### Step 2: Remove Trash and Personal Belongings
Start by removing all trash and personal belongings from the car. This will give you a clear space to work.
### Step 3: Vacuum the Interior
Vacuum the entire interior, including the seats, carpets, floor mats, and trunk. Use the attachments to reach crevices and tight spaces.
### Step 4: Clean the Dashboard and Console
Spray interior cleaner onto a microfiber cloth and wipe down the dashboard, console, and door panels. Use detailing brushes to clean vents and hard-to-reach areas.
### Step 5: Clean the Seats
If you have fabric seats, use upholstery cleaner to remove stains and dirt. Follow the instructions on the cleaner packaging. If you have leather seats, clean them with a leather cleaner and then condition them with a leather conditioner.
### Step 6: Clean the Windows and Mirrors
Spray window cleaner onto a microfiber cloth and clean the interior windows and mirrors.
### Step 7: Clean the Floor Mats
Remove the floor mats and clean them separately. Vacuum them to remove loose dirt and debris, then wash them with soap and water or upholstery cleaner. Allow them to dry completely before placing them back in the car.
[Browse top-rated interior and exterior car wash on Amazon]
## Tools for the Job: Recommended Products
Okay, you’ve got the steps down. Now, let’s talk about some products that can make the process easier and more effective.
### Chemical Guys Mr. Pink Super Suds Car Wash Soap
* **Key Features:** pH-balanced, super-foaming, gentle on paint.
* **Why We Like It:** This soap creates a thick, luxurious foam that lifts away dirt and grime without stripping wax. It’s also safe for all car finishes. The pH-balanced formula is gentle, ensuring your car’s paint isn’t damaged during the wash. Plus, a little goes a long way, making it a cost-effective choice.
### Meguiar’s Gold Class Leather Conditioner
* **Key Features:** Contains aloe and moisturizing oils, protects against UV damage, non-greasy formula.
* **Why We Like It:** If you have leather seats, this conditioner is a must-have. It nourishes and protects the leather, keeping it soft and supple. The aloe and moisturizing oils prevent cracking and fading, while the UV protection helps shield the leather from sun damage. The non-greasy formula ensures a comfortable feel. This helps keep your leather interior looking and feeling luxurious for years to come.
[Browse top-rated interior and exterior car wash on Amazon]
## Pro-Tips / FAQ Section
* **Wash in the Shade:** Avoid washing your car in direct sunlight, as the soap can dry too quickly and leave water spots.
* **Use a Grit Guard:** Place a grit guard in the bottom of your wash bucket to prevent dirt and debris from swirling back onto your car.
* **Two-Bucket Method is Key:** Always use the two-bucket method to avoid scratching your paint.
* **Don’t Forget the Door Jambs:** Clean the door jambs with a damp cloth and dry them thoroughly.
* **How often should I wash my car?** This depends on your driving conditions and personal preferences. Generally, washing your car every 2-4 weeks is a good rule of thumb.
* **What’s the best way to remove bird droppings?** Remove bird droppings as soon as possible, as they can damage your paint. Use a bird dropping remover or soak the area with warm water and then gently wipe it away.
* **Can I use a pressure washer to wash my car?** Yes, but be careful not to use too much pressure, as it can damage your paint. Use a wide-angle nozzle and keep the pressure low.
[Browse top-rated interior and exterior car wash on Amazon]
## Showroom Shine Achieved!
Congratulations! You’ve just completed a thorough interior and exterior car wash. By following these steps and using the right products, you can keep your car looking its best for years to come. Remember, regular maintenance is key to preserving your car’s value and appearance. Now, go out there and enjoy the feeling of driving a sparkling clean car! You deserve it.
[Check the latest prices and deals for interior and exterior car wash on Amazon today!]