[Get the best value headlight restoration on Amazon today!]
# Headlight Restoration: The Ultimate 2026 Guide to Crystal Clear Headlights
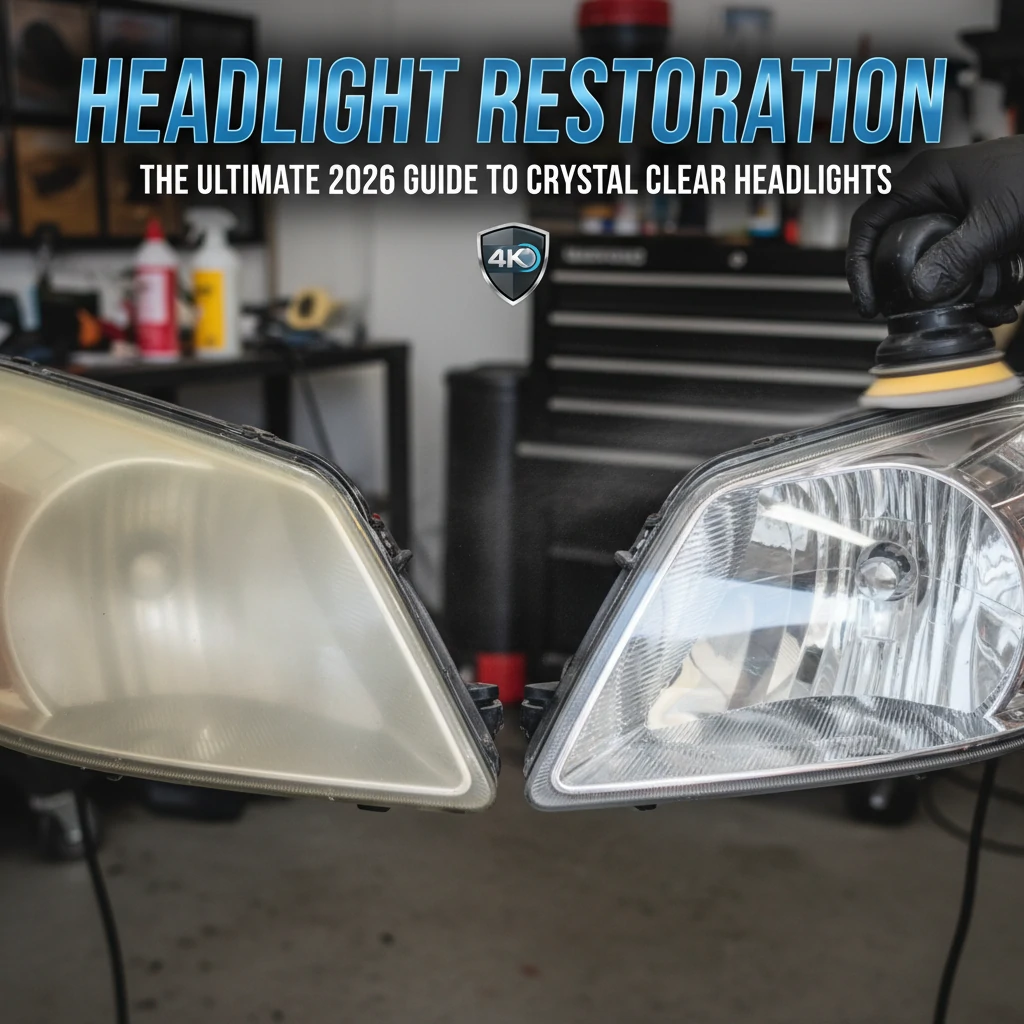
Are your headlights looking a little foggy? Do they seem dimmer than they used to? Don’t worry, you’re not alone! Cloudy, yellowed headlights are a common problem, but the good news is that you don’t necessarily need to replace them. With the right techniques and products, you can achieve crystal clear headlights and dramatically improve your visibility on the road. This ultimate 2026 guide will walk you through everything you need to know about headlight restoration, so you can make your headlights shine like new again!
We’ll cover the causes of headlight clouding, the different restoration methods available, and provide step-by-step instructions to guide you through the process. Let’s get started!
[Browse top-rated headlight restoration on Amazon]
## Why Do Headlights Get Cloudy?
Before diving into the restoration process, it’s helpful to understand why headlights become cloudy in the first place. The primary culprit is the sun’s ultraviolet (UV) rays. Most modern headlights are made of polycarbonate plastic, which is durable and impact-resistant. However, this material is susceptible to UV degradation.
Here’s a breakdown of the key factors:
* **UV Exposure:** Over time, UV radiation breaks down the outer layer of the polycarbonate, causing it to oxidize and become hazy.
* **Environmental Factors:** Road debris, salt, and other environmental contaminants can also contribute to surface damage and clouding.
* **Heat:** Heat from the headlight bulbs themselves can accelerate the degradation process.
* **Factory Coating Failure:** Headlights come with a protective UV coating from the factory. This coating eventually wears off, leaving the plastic vulnerable.
Understanding these factors will help you appreciate the importance of proper headlight restoration and ongoing maintenance.
[Browse top-rated headlight restoration on Amazon]
## Headlight Restoration: The Step-by-Step Guide to Clarity
Now, let’s get to the heart of the matter: restoring your headlights! This guide outlines a comprehensive method for achieving professional-quality results. While different kits and approaches exist, this method combines the best practices for long-lasting clarity.
### Step 1: Gather Your Supplies
Before you begin, make sure you have all the necessary materials. This will save you time and frustration later on. Here’s a list of essential supplies:
* **Headlight Restoration Kit:** Choose a high-quality kit that includes sandpaper (various grits), polishing compound, and a UV sealant. We’ll recommend a few excellent options later.
* **Masking Tape:** To protect the surrounding paint.
* **Spray Bottle with Water:** For wet sanding.
* **Microfiber Towels:** For cleaning and polishing.
* **Drill with Polishing Pad Attachment (Optional but Recommended):** Speeds up the polishing process.
* **Gloves:** To protect your hands.
* **Safety Glasses:** To protect your eyes.
### Step 2: Clean the Headlights Thoroughly
Start by cleaning the headlights with soap and water to remove any dirt, grime, or debris. Rinse thoroughly and dry with a clean microfiber towel.
### Step 3: Mask the Surrounding Area
Use masking tape to carefully protect the paint around the headlights. This is crucial to prevent accidental damage during the sanding and polishing stages. Apply the tape in multiple layers for added protection.
### Step 4: Wet Sanding (The Key to Clarity)
This is the most important step in the restoration process. Wet sanding removes the damaged outer layer of the polycarbonate and creates a smooth surface for polishing.
1. **Start with the Coarsest Grit:** Begin with the coarsest grit sandpaper included in your kit (typically 400-600 grit).
2. **Wet the Sandpaper and Headlight:** Generously spray both the sandpaper and the headlight with water.
3. **Sand in a Consistent Pattern:** Using moderate pressure, sand the headlight in a back-and-forth or circular motion. Maintain a consistent pattern to ensure even removal of the damaged layer.
4. **Rinse and Repeat:** Rinse the headlight and sandpaper frequently to remove debris. Continue sanding until the entire surface appears uniformly frosted.
5. **Move to Finer Grits:** Gradually move to finer grits of sandpaper (typically 800-1000, then 1500-2000, and finally 3000). Repeat the wet sanding process with each grit, ensuring you remove the scratches left by the previous grit.
6. **Final Rinse:** After sanding with the finest grit, rinse the headlight thoroughly and dry with a clean microfiber towel. The surface should now appear much smoother and less cloudy.
**Pro Tip:** Don’t skip grits! Each grit plays a crucial role in refining the surface. Skipping grits will result in uneven polishing and a less-than-perfect finish.
### Step 5: Polishing (Bringing Back the Shine)
Polishing removes the fine scratches left by the sanding process and restores the clarity and shine of the headlight.
1. **Apply Polishing Compound:** Apply a small amount of polishing compound to a clean polishing pad (either by hand or using a drill attachment).
2. **Polish the Headlight:** Using moderate pressure, polish the headlight in a circular motion. If using a drill attachment, start with a low speed and gradually increase it as needed.
3. **Wipe Away Residue:** After polishing, wipe away any remaining residue with a clean microfiber towel.
4. **Repeat if Necessary:** If the headlight is still not perfectly clear, repeat the polishing process.
### Step 6: Apply UV Sealant (Protecting Your Investment)
This is the final and most crucial step for long-lasting results. The UV sealant protects the restored headlight from future UV damage and oxidation.
1. **Clean the Headlight:** Ensure the headlight is clean and dry before applying the sealant.
2. **Apply Sealant:** Apply a thin, even coat of UV sealant to the headlight, following the instructions provided with your kit. Some sealants are applied with a cloth, while others are sprayed on.
3. **Allow to Cure:** Allow the sealant to cure completely, according to the manufacturer’s instructions. This may take several hours or even overnight. Avoid exposing the headlights to water or direct sunlight during the curing process.
**Pro Tip:** Reapply the UV sealant every 6-12 months to maintain the clarity of your headlights and protect them from future damage.
[Browse top-rated headlight restoration on Amazon]
## Tools for the Job: Recommended Headlight Restoration Kits
Choosing the right headlight restoration kit can make a significant difference in the ease and effectiveness of the process. Here are a few highly recommended options available on Amazon:
* **3M Headlight Restoration Kit:** This kit is a popular choice among professionals and DIYers alike. It includes high-quality sandpaper, polishing compound, and a drill attachment for easy polishing. The 3M kit is known for its effectiveness and durability.
* **Key Features:** Includes Trizact abrasive discs for consistent sanding, polishing compound for removing fine scratches, and a clear coat for UV protection.
* **Why We Like It:** The Trizact discs are incredibly effective at removing the damaged layer of plastic, and the clear coat provides long-lasting protection. This kit delivers professional-quality results.
* **Meguiar’s Headlight Restoration Kit:** This kit is another excellent option, offering a user-friendly and effective solution for restoring headlight clarity. It includes a polishing compound and a sealant for long-lasting protection.
* **Key Features:** Includes abrasive pads for sanding, PlastX polish for removing oxidation, and a Headlight Protectant for UV protection.
* **Why We Like It:** The PlastX polish is easy to use and effectively removes cloudiness. The Headlight Protectant helps to prevent future yellowing and fading.
* **Sylvania Headlight Restoration Kit:** This kit offers a complete solution for restoring headlight clarity, including everything you need for sanding, polishing, and sealing. It’s a great value for the price.
* **Key Features:** Includes sanding discs, clarifying compound, polishing compound, and a UV block clear coat.
* **Why We Like It:** The UV block clear coat provides excellent protection against future sun damage. This kit is a great choice for those looking for a long-lasting solution.
When choosing a kit, consider the severity of the headlight clouding, your budget, and your experience level. All of these kits will produce excellent results when used correctly.
[Browse top-rated headlight restoration on Amazon]
## Pro-Tips & FAQ: Common Headlight Restoration Questions
Here are some additional tips and answers to frequently asked questions about headlight restoration:
* **How often should I restore my headlights?** The frequency of headlight restoration depends on factors such as climate, driving conditions, and the quality of the UV sealant used. Generally, it’s recommended to restore your headlights every 1-2 years, or whenever you notice significant clouding.
* **Can I use toothpaste to restore my headlights?** While toothpaste may provide a temporary improvement in clarity, it’s not a long-term solution. Toothpaste contains mild abrasives that can remove some surface oxidation, but it doesn’t provide the same level of correction as professional headlight restoration kits. Additionally, toothpaste doesn’t offer any UV protection, so the clouding will quickly return.
* **What if my headlights are severely damaged?** If your headlights are severely cracked or damaged, restoration may not be possible. In this case, you may need to replace the headlights entirely.
* **How can I prevent headlight clouding?** The best way to prevent headlight clouding is to protect your headlights from UV exposure
[Check the latest prices and deals for headlight restoration on Amazon today!]