[Get the best value headlight restoration prices on Amazon today!]
# Headlight Restoration Prices in 2026: Are DIY Kits Worth It?
Cloudy, yellowed headlights. We’ve all seen them. They’re not just an aesthetic issue; they significantly impact your nighttime visibility, making driving more dangerous. If you’re wondering about headlight restoration prices in 2026 and whether those DIY kits are really worth the effort (and the savings), you’ve come to the right place. This article dives deep into the costs associated with professional headlight restoration versus tackling the job yourself. We’ll explore the factors influencing prices, the effectiveness of DIY kits, and ultimately, help you decide the best path forward for restoring your headlights and ensuring your safety on the road.
[Browse top-rated headlight restoration prices on Amazon]
## The Problem: Why Do Headlights Get Cloudy?
Before we delve into the *headlight restoration prices*, it’s important to understand why headlights become hazy in the first place. The primary culprit is the sun’s ultraviolet (UV) radiation. Most modern headlights are made of polycarbonate plastic, which is durable but susceptible to UV damage. Over time, the UV rays break down the outer layer of the plastic, causing it to oxidize and turn yellow or cloudy.
Other factors contribute to headlight degradation, including:
* **Road Debris:** Sand, salt, and other debris kicked up from the road can scratch and pit the headlight lenses.
* **Chemical Exposure:** Car wash soaps, waxes, and other chemicals can also damage the plastic over time.
* **Temperature Fluctuations:** Extreme temperature changes can cause the plastic to expand and contract, leading to cracks and hazing.
Regardless of the cause, hazy headlights reduce light output, making it harder to see at night and increasing the risk of accidents. Addressing this issue is not just about aesthetics; it’s about safety.
[Browse top-rated headlight restoration prices on Amazon]
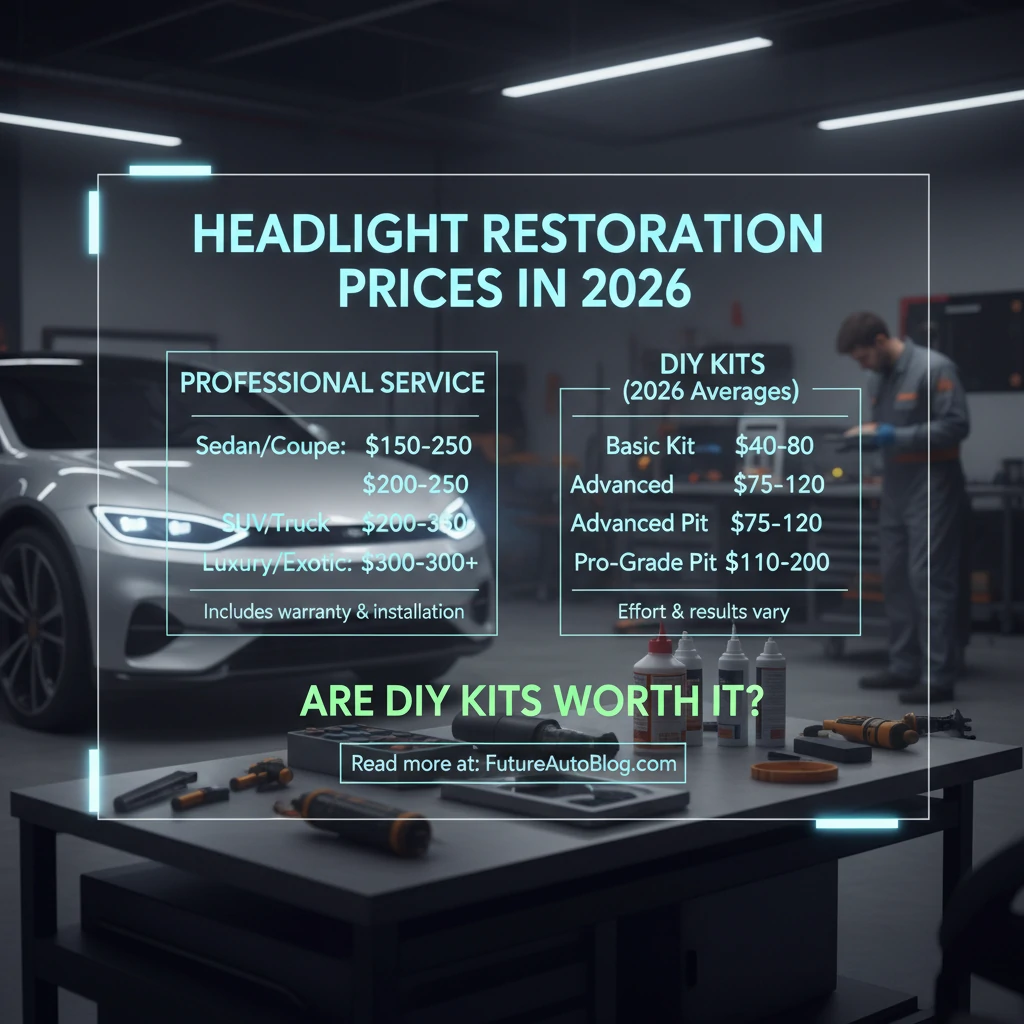
## Professional Headlight Restoration Prices in 2026
So, what can you expect to pay for professional *headlight restoration prices* in 2026? The cost can vary widely depending on several factors:
* **Location:** Prices tend to be higher in urban areas with higher labor costs.
* **Service Provider:** Dealerships generally charge more than independent auto detailers.
* **Severity of Damage:** Heavily oxidized headlights will require more intensive restoration, increasing the price.
* **Restoration Method:** Different methods, such as sanding and polishing or applying a protective coating, can affect the cost.
Generally, you can expect to pay anywhere from **$75 to $150 per pair of headlights** for professional restoration. Some high-end detailers may charge even more for specialized services.
Here’s a breakdown of potential costs:
* **Basic Restoration (Sanding and Polishing):** $75 – $120 per pair
* **Restoration with UV Coating:** $100 – $150 per pair
* **Dealership Restoration:** $120 – $200+ per pair
Keep in mind that these are just estimates. It’s always best to get a quote from a few different providers to compare *headlight restoration prices* in your area.
[Browse top-rated headlight restoration prices on Amazon]
## The DIY Alternative: Headlight Restoration Kits
Now, let’s consider the DIY route. Headlight restoration kits offer a potentially cheaper alternative to professional service. These kits typically include:
* **Sandpaper (various grits):** Used to remove the oxidized layer of plastic.
* **Polishing Compound:** Used to restore clarity and shine.
* **Applicator Pads:** Used to apply the polishing compound.
* **UV Protectant:** Used to protect the headlights from future damage.
DIY *headlight restoration prices* range from **$15 to $50**, depending on the quality and completeness of the kit.
### Are DIY Kits Worth It? The Pros and Cons
The big question: are DIY headlight restoration kits worth the effort and the savings? Here’s a balanced look at the pros and cons:
**Pros:**
* **Cost-Effective:** DIY kits are significantly cheaper than professional restoration.
* **Convenient:** You can restore your headlights in your own driveway or garage.
* **Sense of Accomplishment:** There’s satisfaction in tackling the job yourself.
**Cons:**
* **Time-Consuming:** The process can take several hours, depending on the severity of the damage.
* **Requires Effort:** Sanding and polishing require physical effort and attention to detail.
* **Inconsistent Results:** The results can vary depending on your technique and the quality of the kit.
* **Potential for Damage:** Improper sanding can scratch or damage the headlights.
* **Longevity Concerns:** DIY restorations may not last as long as professional restorations, especially without proper UV protection.
Ultimately, the decision of whether to use a DIY kit depends on your budget, skill level, and willingness to invest the time and effort.
[Browse top-rated headlight restoration prices on Amazon]
## Choosing the Right DIY Headlight Restoration Kit
If you decide to go the DIY route, choosing the right kit is crucial. Here are some factors to consider:
* **Completeness:** Does the kit include everything you need, including sandpaper, polishing compound, applicator pads, and UV protectant?
* **Quality of Materials:** Look for kits with high-quality sandpaper and polishing compounds for best results.
* **Ease of Use:** Choose a kit with clear instructions and easy-to-use applicators.
* **UV Protection:** A good UV protectant is essential for preventing future oxidation.
Here are a couple of recommended DIY headlight restoration kits available on Amazon:
1. **Meguiar’s Heavy Duty Headlight Restoration Kit:** This kit is a popular choice for its comprehensive set of materials and easy-to-follow instructions. It includes everything you need to restore your headlights to like-new condition. Its key features include multiple grades of sandpaper for effective oxidation removal and a PlastX polish for restoring clarity.
2. **3M Headlight Restoration Kit:** 3M is a trusted brand in automotive care, and their headlight restoration kit is known for its quality and durability. It features a multi-step process that includes sanding, polishing, and protecting your headlights. Its key features include a Trizact sanding disc for even abrasion and a rubbing compound for a professional-grade finish.
[Browse top-rated headlight restoration prices on Amazon]
## Step-by-Step Guide to DIY Headlight Restoration
If you’re ready to tackle the job yourself, here’s a step-by-step guide to restoring your headlights using a DIY kit:
**Tools for the Job:**
* DIY Headlight Restoration Kit (e.g., Meguiar’s or 3M)
* Masking Tape
* Spray Bottle with Water
* Clean Microfiber Cloths
**Step 1: Preparation**
* Park your car in a shaded area.
* Clean your headlights with soap and water.
* Dry the headlights thoroughly.
* Mask off the area around the headlights with masking tape to protect the paint.
**Step 2: Sanding**
* Wet the headlight with water.
* Start with the coarsest grit sandpaper included in the kit.
* Sand the headlight in a back-and-forth motion, applying even pressure.
* Continue sanding until the yellowed or cloudy layer is removed.
* Rinse the headlight with water and wipe clean.
* Repeat the sanding process with progressively finer grits of sandpaper, rinsing and wiping clean after each grit.
**Step 3: Polishing**
* Apply a small amount of polishing compound to an applicator pad.
* Polish the headlight in a circular motion, applying even pressure.
* Continue polishing until the headlight is clear and shiny.
* Wipe off any excess polishing compound with a clean microfiber cloth.
**Step 4: UV Protection**
* Apply the UV protectant to the headlight according to the instructions in the kit.
* Allow the protectant to dry completely before driving.
[Browse top-rated headlight restoration prices on Amazon]
## Pro-Tips for Headlight Restoration
Here are a few pro-tips to help you achieve the best possible results:
* **Take Your Time:** Don’t rush the process. Take your time and pay attention to detail.
* **Use Plenty of Water:** Keep the sandpaper and headlight wet during the sanding process to prevent clogging and scratching.
* **Apply Even Pressure:** Apply even pressure during sanding and polishing to ensure consistent results.
* **Follow the Instructions:** Read and follow the instructions in the kit carefully.
* **Reapply UV Protectant:** Reapply the UV protectant every few months to maintain the clarity of your headlights.
[Browse top-rated headlight restoration prices on Amazon]
## FAQ About Headlight Restoration
**Q: How long does headlight restoration last?**
A: The longevity of headlight restoration depends on several factors, including the quality of the restoration, the climate, and the amount of sun exposure. Professional restorations with UV coating can last for several years, while DIY restorations may only last for a year or two.
**Q: Can I use toothpaste to restore my headlights?**
A: Toothpaste can be used as a temporary fix for minor hazing, but it’s not as effective as a dedicated headlight restoration kit. Toothpaste contains mild abrasives that can help remove surface oxidation, but it won’t provide long-lasting results.
**Q: Is it worth replacing my headlights instead of restoring them?**
A: Replacing your headlights may be necessary if they are cracked or damaged beyond repair. However, if the hazing is the only issue, restoring your headlights is a more cost-effective solution.
**Q: Can I restore plastic headlights with glass cleaner?**
A: No, glass
[Check the latest prices and deals for headlight restoration prices on Amazon today!]