1")
[Get the best value car leather wash on Amazon today!]
# How to Clean Car Leather: The Ultimate Guide (2026)
So, you want to keep your car leather looking its best, huh? You’ve come to the right place! Leather interiors add a touch of luxury and comfort to any vehicle, but they require regular cleaning and care to prevent cracking, fading, and general wear and tear. This ultimate guide will walk you through everything you need to know about how to clean car leather, step-by-step, ensuring your seats stay supple, clean, and looking showroom-new for years to come. Consider this your go-to resource for car leather care in 2026!
[Browse top-rated car leather wash on Amazon]
## Step-by-Step Guide to Cleaning Your Car Leather
Follow these simple steps to effectively clean and condition your car leather. We’ll cover everything from preparing your supplies to applying the final touches.
### Step 1: Gather Your Supplies
Before you start, make sure you have all the necessary supplies within reach. This will make the cleaning process much smoother. Here’s what you’ll need for a thorough car leather wash:
* **Vacuum Cleaner with Brush Attachment:** To remove loose dirt and debris.
* **Soft Microfiber Cloths:** For wiping and applying cleaning solutions.
* **Leather Cleaner:** Specifically formulated for car leather. Avoid harsh chemicals.
* **Leather Conditioner:** To moisturize and protect the leather after cleaning.
* **Two Buckets:** One for clean water, one for rinsing your cloths.
* **Soft Bristle Brush (Optional):** For heavily soiled areas.
### Step 2: Vacuum the Leather Surfaces
The first step is to remove any loose dirt, crumbs, and debris from the leather surfaces. Use the vacuum cleaner with the brush attachment to gently vacuum the seats, door panels, and any other leather areas. Pay close attention to seams and crevices where dirt tends to accumulate. This prevents scratching the leather during the cleaning process.
### Step 3: Prepare Your Leather Cleaner
Always follow the manufacturer’s instructions on your chosen leather cleaner. Some cleaners are ready to use, while others may require dilution. If dilution is needed, use clean water. It’s crucial to test the cleaner on an inconspicuous area first to ensure it doesn’t discolor or damage the leather. A small spot on the underside of a seat is ideal for this test.
### Step 4: Apply the Leather Cleaner
Dampen a clean microfiber cloth with the leather cleaner. Do not saturate the cloth; it should be damp, not dripping wet. Gently wipe the leather surfaces in a circular motion, working in small sections. Avoid applying too much pressure, as this can damage the leather. For heavily soiled areas, you can use a soft-bristle brush to gently scrub the dirt loose.
### Step 5: Wipe Away the Cleaner
After cleaning a section, use a clean, damp microfiber cloth to wipe away any remaining cleaner. Make sure to remove all traces of the cleaner, as residue can attract dirt and grime. Rinse the cloth frequently in your bucket of clean water to keep it clean and effective.
### Step 6: Dry the Leather
Once you’ve wiped away the cleaner, use a dry microfiber cloth to thoroughly dry the leather surfaces. This will prevent water spots and help the leather retain its natural moisture. Ensure the leather is completely dry before moving on to the next step.
### Step 7: Apply Leather Conditioner
After cleaning and drying the leather, it’s essential to apply a leather conditioner. This will help to moisturize the leather, prevent cracking, and keep it supple. Apply a small amount of leather conditioner to a clean microfiber cloth and gently massage it into the leather. Again, follow the manufacturer’s instructions on the conditioner.
### Step 8: Buff the Leather
Allow the leather conditioner to sit for the recommended time (usually a few minutes) and then buff the leather with a clean, dry microfiber cloth. This will remove any excess conditioner and leave the leather with a smooth, natural shine. Buffing also helps to evenly distribute the conditioner and ensure it’s fully absorbed.
### Step 9: Final Inspection
Take a step back and inspect your work. Make sure you’ve cleaned and conditioned all leather surfaces thoroughly. If you notice any remaining dirt or grime, repeat the cleaning process as needed. Enjoy your freshly cleaned and conditioned car leather!
[Browse top-rated car leather wash on Amazon]
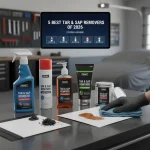
## Tools for the Job
To make the car leather wash process even easier and more effective, consider using these recommended products:
* **Chemical Guys Leather Cleaner and Conditioner Complete Leather Care Kit:** This kit includes everything you need to clean, condition, and protect your car leather. The cleaner is pH-balanced and gentle on leather, while the conditioner contains natural oils to keep the leather supple and prevent cracking. The kit also includes microfiber cloths and an applicator pad, making it a convenient and comprehensive solution.
* **Key Features:** pH-balanced cleaner, natural oil-based conditioner, includes microfiber cloths and applicator pad.
* **Why We Like It:** The complete kit provides everything you need in one package, ensuring you have the right products for the job. The pH-balanced cleaner is gentle on leather, and the natural oil-based conditioner keeps the leather supple and protected.
* **Meguiar’s Gold Class Leather Conditioner:** This conditioner is specifically designed to moisturize and protect car leather. It contains aloe and moisturizing oils to keep the leather soft and prevent drying and cracking. The formula also includes UV protectants to help prevent fading and discoloration caused by the sun.
* **Key Features:** Contains aloe and moisturizing oils, UV protectants, easy to apply.
* **Why We Like It:** The Meguiar’s Gold Class Leather Conditioner is easy to apply and provides excellent moisturization and protection. The UV protectants are a great addition, helping to prevent fading and discoloration.
[Browse top-rated car leather wash on Amazon]
## Pro-Tips / FAQ Section
Here are some pro-tips and frequently asked questions to help you achieve the best results when cleaning your car leather:
* **How often should I clean my car leather?**
* It’s recommended to clean your car leather every 3-6 months, depending on how often you use your car and the conditions it’s exposed to. Regular cleaning will prevent dirt and grime from building up and damaging the leather.
* **Can I use household cleaners on car leather?**
* No, it’s not recommended to use household cleaners on car leather. Many household cleaners contain harsh chemicals that can damage the leather, causing it to dry out, crack, or discolor. Always use cleaners specifically formulated for car leather.
* **What should I do if I spill something on my car leather?**
* Act quickly! Blot the spill with a clean microfiber cloth as soon as possible. Avoid rubbing the spill, as this can spread it and make it harder to remove. Once you’ve blotted the spill, clean the area with a leather cleaner and conditioner as described in the steps above.
* **How can I prevent my car leather from cracking?**
* Regular cleaning and conditioning are essential for preventing car leather from cracking. Leather conditioner helps to moisturize the leather and keep it supple, preventing it from drying out and cracking. Also, try to park your car in the shade or use a sunshade to protect the leather from direct sunlight, which can cause it to fade and crack.
* **What about cleaning perforated leather?**
* Perforated leather can be trickier to clean, as dirt and grime can get trapped in the small holes. Use a soft-bristle brush to gently scrub the leather and remove any trapped dirt. Be careful not to apply too much pressure, as this can damage the leather.
* **How do I remove stains from car leather?**
* For stubborn stains, you may need to use a specialized leather stain remover. Follow the manufacturer’s instructions carefully and test the stain remover on an inconspicuous area first. If the stain persists, consider consulting a professional leather cleaner.
* **What’s the best way to protect leather from sun damage?**
* Park in the shade whenever possible. Use a sunshade when parking in direct sunlight. Regularly apply a leather conditioner with UV protectants. Consider having a professional leather protectant applied for long-term protection.
[Browse top-rated car leather wash on Amazon]
## Encouraging Conclusion
Congratulations! You’ve now mastered the art of cleaning car leather. By following these simple steps and using the right products, you can keep your car leather looking its best for years to come. Remember to clean and condition your leather regularly, and don’t be afraid to seek professional help if you encounter any stubborn stains or damage. Your car’s interior will thank you for it, and you’ll enjoy a more comfortable and luxurious driving experience. Now go out there and give your car leather the TLC it deserves! You’ve got this!
[Check the latest prices and deals for car leather wash on Amazon today!]